
Ducts are always easier to improve when you can get your hands on them. In many homes, the longest duct runs are readily accessible in attics, crawlspaces, or basements. Plenum boxes are usually there, too. Any time we need to repair or modify these ducts to improve airflow, they’re at our immediate disposal.
But other times, we simply can’t get our hands around your airflow problem. The misbehaving ducts are behind walls or between floors. To get at them, we’d have to tear your home apart! You don’t want us to do that. Neither do we.
The good news? There are still ways to improve airflow when the problem ducts are sequestered behind drywall. Here are three ways to do it.
1. Is one vent blowing too hard? Install opposed blade dampers at the supply registers.
Even when we can’t access your ducts, we can always access your supply registers. These are the little vents scattered throughout your house where the HVAC system sends the conditioned air.
When a room is getting more air than it needs, opposed blade dampers, aka “opposed dampers,” can help you balance airflow at the register. They can be installed at the boot (just behind the visible part of the register) and, depending on your preferences, easily adjusted to direct more or less air to a given room.
Installing these dampers should always be combined with a test and balance procedure that optimizes airflow across your home. Otherwise, you run the risk of creating other airflow problems or increasing static pressure beyond a safe threshold.
To be clear, opposed dampers will not fix a problem with your ducts.
However, they allow you to increase or decrease airflow to certain areas of your home despite a problem with a hidden duct. In many cases, opposed dampers are all you need to correct a problem with excessive airflow.
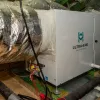
2. Use Aeroseal to seal ducts from the inside.
When leaky ducts are in an accessible area, sealing them doesn’t require any special equipment. Mastic or mastic tape nearly always does the trick. But how do you seal leaky ducts located behind walls?
The answer is Aeroseal. It’s a duct-sealing product that only approved contractors can apply. After cleaning your ducts, a contractor uses specialized equipment to apply Aeroseal inside your ductwork – even the ducts behind walls! Following application, the Aeroseal product hardens within the gaps and cracks inside your ductwork, effectively sealing leaky areas that are otherwise inaccessible.
How does Aeroseal improve airflow? By helping move all the air inside your ducts to the supply registers.
When supply ducts leak, a lot of the air that would otherwise make it to a given room just… doesn’t. Aeroseal prevents the air from escaping until it arrives at its destination. If a room doesn’t get enough air right now, it might after applying Aeroseal.
Note that Aeroseal helps seal relatively small gaps and holes. It can’t fill in large holes, seal disconnected ducts, or account for damaged or crushed ductwork behind walls.
And while the cumulative effect of Aeroseal within a home’s entire duct system is to minimize leakage and increase airflow, it’s unlikely to balance the air among different rooms on its own. It can increase airflow when there’s too little, but it’s not a comprehensive fix for an unbalanced system or faulty ductwork.
Bonus: When Aeroseal dramatically reduces duct leakage, it also helps your HVAC system operate more efficiently. You save money and improve airflow at the same time!
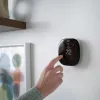
3. Get a thermostat with room sensors.
When opposed dampers won’t cut down on excess airflow or if you’re not ready to spring for Aeroseal when there’s too little airflow, a different thermostat might fix your problem, hidden ducts or not.
To be more specific, a new thermostat with room sensors might fix the problem.
If your home has a single HVAC system, your thermostat only monitors the temperature in the room where it’s installed. Some thermostats, like the Ecobee Smart Thermostat and Ecobee3 lite, can communicate with remote sensors. Just install the sensors in the rooms with airflow problems and set them to your desired temperature. Done.
Instead of heating or cooling your home to the temperature in the room where the thermostat is located, you can heat or cool your home to the temperature in the room where the sensor is located.
Typically, the sensor tells the system to run longer so that the room with the sensor gets more air. You can always program these sensors to your desired comfort level; depending on your settings, the system will send a greater or lesser volume of air to a given space.
This method almost always works, but there’s a downside.
When you’re using the sensor to heat or cool a room that normally doesn’t get enough airflow, you’ll probably overcook or overheat other areas of your home. Your HVAC system will also consume more energy since it’s running for longer cycles.
If you’re ok with that – and if you’re not using the overcooled or overheated parts of your home when your thermostat prioritizes the sensor – switching to one of these thermostats can be a good solution.
Hidden ducts aren’t always a dead end.
Problems with inaccessible ducts can cause airflow problems. Thankfully, there are ways to improve airflow even when you can’t see or touch the problematic ducts.
Is it easier to fix ducts when you can access them directly? Definitely. But that doesn’t mean there aren’t solutions.
Most of the methods we’ve discussed here are reliable and will work for most homes. However, there are exceptions. When ducts are severely bent, crushed, or otherwise damaged, the only way to improve airflow may be to replace the ducts themselves.
Proper airflow, of course, is important for staying comfortable in every room of your home at all times of the year.
If you’re concerned about airflow issues in your Atlanta home, give us a holler! Whether or not a hidden duct is to blame, we’ll help you find what’s causing the problem and identify the best solution.